
Alright kiddos, time to sit down, shut up and listen to ol' Uncle Kinsei here.
I gots a new improved tuts for you guys who want to have some fun with some simple glass etching.
All etching is permanent surface etch. so don't go out and put this shit on your ma's windshield or something, she might be a wee bit pissed.
Oi lets get the shit together to do this.
Step 1. You won't need much; Some glass (I got an old syrup bottle), Some Glass Etching Cream (Armour Etch is the brand i use here), A foam brush to Apply said cream (Don't use your finger, remember this stuff is an acid after all.) Some Tape, Some Hobby Knives, And Some Vinyl.
If you don't have Vinyl, or a plotter to cut extensive patters etc, then go out to Walmart or something and get some Avery Shipping Labels, the big ones work best and you can feed them through your printer to print your designs. We'll get to that later.
Step 2. Make sure your glass is clean and your design ready. If you don't have one, then go get one or something. you should already have a pretty good idea of what you want on that glass well before this point. Trust me you won't want to be winging it half way through applying the etching cream.
I'm lucky enough to have access to scrap vinyl and a plotter at my place of work. So that makes it much easier for me to tackle this than many other. If your a normal person who can't randomly drop a couple hundred dollars on a vinyl plotter in a pinch, your lucky that I'm broke too and have found a way about that. Those Avery Shipping labels are fucking awesome. If you work digitally then this is almost as good as the vinyl, just requires more work.
Step 3. Apply your "Mask." (Yeah my little nephew helped out with this. so those are his little hands.) Again if you have a vinyl plotter, it cuts your mask for you, you just have to pick and weed and apply the transfer tape and then transfer it. For everyone else, after you print out your design on the shipping labels, stick it to the glass.
From here you can trace it with your Hobby knife. Fresh blades help, but are not a must, also this will dull a blade quick so use your own discretion here. Be very careful especially if you are on a curved surface. There is a good chance you will slip and cut the shit out of your self. I hope you have a strong stomach and good insurance.
After you finish this part. Pick and weed the the parts you want etched.
Step 4. Admire that shit. Yeah. I used a positive image instead of a negative. So I had to mask off some more with some masking tape. No biggy. I just did a little box. Plenty fine for what I got going on. If yours requires no extra masking, then great, you saved yourself some expensive ass tape. that shit cost like 3 bucks a role yo!
Step 5. Time to get to business with the cream.Again This stuff is dangerous. It will eat through your skin. Might want to consider gloves. Also don't breath this stuff, or ingest it, you know what, don't even look at it funny, It just might climb out the bottle and whoop your ass all Chuck Norris style just cause it don't like you.
Get pretty free with the cream, I've tried stretching it thin and I always seem to get holes everywhere. so be pretty liberal with it. Use a foam Applicator to dab it on. When using bristle brushes, I again fount it streaked more than applied it evenly. Just some friendly tips from a guy who went through the trial and error. (Yeah my 5 year old nephew did the photos on these ones. not bad all things considering.)
Step 6. This part is pretty easy. Let it set for about 5 minutes. you can let it set longer, but it doesn't etch much deeper. I took this time to kind of clean up and pack up my stuff. might as well, you got a couple minutes.
Step 7. Wash it off. Run some hot water over it, I found if you give it a small rinse and then let it soak for a moment and then run more water over it it comes off easier. Once you start to get some water over it, its a bit safer to touch. From here you start to remove your masks and get everything cleaned up. With the Vinyl the hot water makes it release pretty easily. And most of the time, the Avery labels come off pretty easy too. Some times they leave a bit of adhesive behind or are stubborn, so here is what you do if that happens. Get some oil, motor, 3in1, cooking, what ever, just oil. Pour some on it and let it set for a few minuets. After it has set, clean it with soap and water.
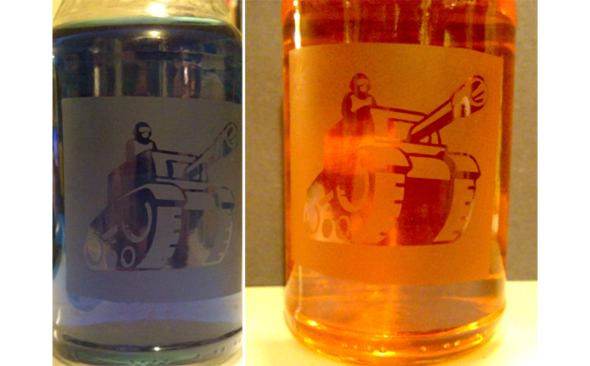
After your bottle glass is cleaned off, its time to sit back and admire it. I put some color liquid in my bottles to help take photos of them. So here is Blue and Orange.
So Over all, I hope this helps you make some creative and fun drinking glasses, decorations or what ever. The etching is permanent and safe to touch and drink from so you can show it off to your buddies and friends on how cool and creative you are.
So Carry on kids. Go out and have some fun, and don't break anything on the way out.
Saminat
freaking bombass glasses Uncle Kinsei! You should totally make these and sell them, you'd probably make quite a bundle!
Kinsei
haha I've been selling etched drinking glasses at the Joplin Third Thursdays during the summer. Although I didn't have any tank ones at the time. But Tom might have a little something to say about me selling stuff with his logo on it with out his permission.